By placing the Dist/OD before the Reverb, this allows the Reverb to add warmth and space to the distorted sound of the guitar. This creates a natural sounding space. If you place the Reverb before the Dist/OD, this will distort the sound of the reverb. This creates a very unnatural space, sort of a banging or clanging sound. This is evident with many configurations. As your signal passes (or flows) across your pedalboard, each new effect will change the signal going into the next effect.
The companion video for the blog post Electric Guitar 104. How to play the chords in the key of G and common chord progressions found in popular songs.
In this post, I want to cover one of the more common keys in songs played on the guitar. Because of the way the guitar strings are laid out, the instrument lends itself perfectly to keys like G, Em, Am, A, D, and E. For this reason, you’ll see a large majority of songs written on guitar being in those keys. So, with that in mind, we are going to explore G Major. (Remember, all major keys are built in the same way, so the relationships between the chords and notes is true for all major keys. If you see it, great. If it isn’t apparent to you, prepare to learn each key individually until it becomes clear.)
Definitions. For the purpose of this post, I’m going to use three words and I’d like to define the way I will be using them here. (These are shortened definitions, as the terms have much deeper meanings.)
Scale: A series of notes defined by their whole step and half step intervals.
Chord: 3 or more notes played together. In this case, each chord will be made using every other note in the scale.
Key: A series of chords based on a scale.
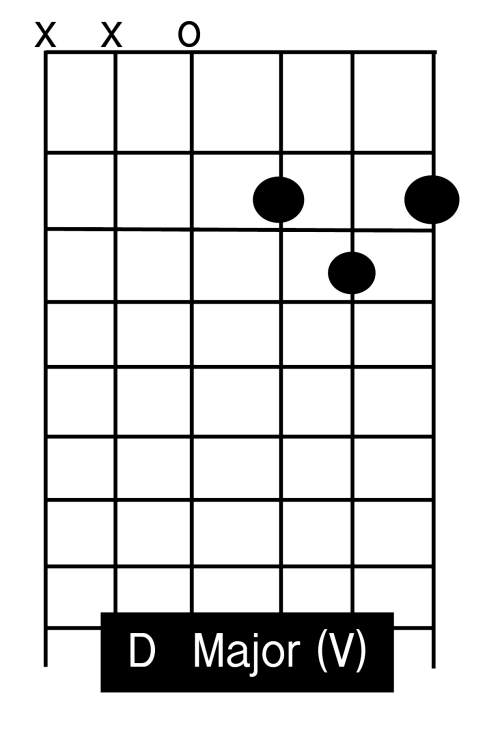
The Key of G uses the scale G Major (G A B C D E F# G) and the chords G Am Bm C D Em F#m7(b5) G.
The major scale is made using a series of whole steps and half steps. We can break the scale up into two halves called “tetrachords”. Each tetrachord of a major scale is Whole Step, Whole Step, Half Step. A major scale is made by joining two tetrachords with a Whole Step. Using these intervals, the major scale is made of these intervals:
1 W 2 W 3 H 4 W 5 W 6 W 7 H 1
If we explore this from the G string, we can find these notes on the following frets:
0 – 2 – 4 – 5 – 7 – 9 – 11 – 12 These notes are G A B C D E F# G.
By moving over to the next string every four or five frets, you can play a Major Scale in one position without moving your hand up and down the neck. The following diagram shows two octaves of the G Major scale in the first position using open strings. Use your index finger on any notes on the first fret, your middle finger on any second fret notes, your ring finger on all third fret notes and your pinky for the note on the fourth fret, fourth string.
Each note in the scale is represented by a chord. These are the majority of chords you’ll find in song that is in a certain key, which is why it is useful to know your keys. This means you will be able to learn songs quickly by only having to learn the sequence of chords, instead of memorizing a new set of chords each time and not being sure what to expect.
Triads: The basic set of chords in a key are called triads. They are made using two notes that are a third apart (1 and 3, in this case G and B) and a third note that is a third above the 3. (The 5th note from the 1). We call these notes a triad. (1-3-5).
Triads are built on thirds, so it’s important to understand what thirds are and how they work. There are two basic kinds of thirds: Major and Minor. Major Thirds are 2 whole steps (4 half steps), and Minor Thirds are 1 1/2 whole steps (3 half steps).
There are four types of triads: Major, Minor, Augmented and Diminished. Each of the four types of triads are built by stacking the two different kinds of thirds.
Major Triad (M): Major 3rd + Minor 3rd
Minor Triad (m): Minor 3rd + Major 3rd
Augmented Triad (+): Major 3rd + Major 3rd
Diminished Triad (dim): Minor 3rd + Minor 3rd
Starting from the Root Note of the key of G, we are going to take every other note from the scale to build our first triad. 1=G 3=B 5=D. (G1 A2 B3 C4 D5 E6 F#7). If we measure the distance from G to B, we find it is 2 steps. The distance from B to D is 1 1/2 steps. This combination of Major 3rd (M3) and Minor 3rd (m3) makes a Major chord. This would then define the first chord of the key (I) as G Major. We could then go to the second note of the scale “A” and repeat the process. This gives us the notes 2=A 4=C 6=E. Measuring A-C-E, we find the pattern m3+M3. This identifies a minor chord, so the 2nd chord of the key (ii) is “A Minor” or Am. You can repeat this process through the scale. I recommend doing it on paper and discover what is contained in each chord for yourself, while looking to discover patterns.
We number the chords from one to seven (one for each note of the major scale) using roman numerals. Upper case roman numerals would indicate a major chord (I, IV, V) and lower case roman numerals would indicate minor chords (ii, iii, vi). After examining the key of G Major (or any major), we will find this pattern of chords:
I ii iii IV V vi viidim
When we apply the G scale to these chords, and adjust them to Major and Minor according to the roman numerals, we find these chords to be in the key of G Major.
GM Am Bm CM DM Em F#dim GM
The most common chords found in nearly any song are the I IV and V chords. We call these chords the Primary Chords of a key. If you play any song in G, you can expect to spend a good amount of time strumming G, C and D.
Common chord progressions are some series of chords that are found on many songs. It is important to remember that what makes a song is a melody (the scale being used by the vocalist or instrumentalist) over the top of the chords (harmony), which only exist to serve the melody. Chord changes can not be copyrighted, however melodies can. This is why many songs use the same chord progression, though in the end do sound quite different. Here are some easy and common progressions to get you strumming.
Each roman numeral indicates a measure of strumming. For simplicity, you can just strum each chord four times and then move on to the next. Repeat each progression several times, mix the progressions together, or experiment with the chords to find new progressions you like.
The Dominant Scale is the same as series of notes as the Mixolydian scale. It is also the same series as the Major scale, except the seventh note is lowered a half step. This scale works well over the dominant seventh (e.g. C7, G7, A7, etc).
1 W 2 W 3 H 4 W 5 W 6 H b7 W 1
Examples:
C Dominant = C D E F G A Bb C (Play over C7)
F Dominant = F G A Bb C D Eb F (Play over F7)
A Dominant = A B C# D E F# G A (Play over A7)
Modulation is the process of changing keys within a composition. In classical theory, certain key changes are often dictated by the form of a piece. In jazz, modulation is a common method of creating intense, interesting and difficult progressions. In pop music, modulation is used to gain certain changes in mood to achieve certain pop standards of composition. Modulating can be complicated or quite simple, depending on the desired effect. In this post, I would like to address one of the simplest modulations and hope to open a door to understanding the basic idea behind it, and give a peek into the idea of simple chord substitution.
Modulating from major to relative minor using simple chord substitution.
For the purpose of this discussion, we will use the sample, relative keys of C Major and A Minor. To keep the example as simple as possible, we will use the I, IV and V7 chords of each key.
C Major: I = C Major (C). IV = F Major (F). V7 = G7.
A Minor: I = A Minor (Am). IV = D Minor (Dm). V7 = E7
Since theses are relative keys, this will be a pretty simple and seamless modulation. The key to this working is the V chord of each key. The two keys contain the same sets of notes, with the only exception being the notes of the V7 chord. To make a long story short, when you play the G7, your ear will expect the C next. When you play the E7, your ear assumes the next chord is Am. In the E7 chord, you will find the G# note. This note is the leading tone of A, and your ear will expect it to resolve to an A next. So, here are two sample progressions. First I will show you the two independent progressions, and then we will arrange the chords to logically lead your ear to move the I from C to Am.
| I | IV | V7 | I |
CM progression:
| C | F | G7 | C |
Am progression:
| Am | Dm | E7 | Am |
Now to blend these together fairly seamlessly, we will use the E7/G# chord and slide the root right into an A. (E7/G# means to play an E7 chord with a G# bass. This would mean the lowest sounding note of your chord should be G#. Consult fingering charts or a reference manual like the Guitar Grimoire Chords and Voicings book for a fingering that suits your tastes.)
To join these progressions, we will insert the following progression between the two which will guide the listener’s ear to the new key.
| C | F | G | E7/G# |
We are substituting the chord E7 (The V7 of the new key) instead of the normal E minor chord for the C Major’s III chord. This leads the ear to A minor, where you can continue the above minor progression. The sequence would look like this:
| C | F | G7 | C |
| C | F | G | E7/G# |
| Am | Dm | E7 | Am |
To return to C, we will use the very common ii-V-I progression and we should be able to return to C in a natural sounding way. Assuming we are still in Am, we will start the progression from the Am. The progression would then look like this:
| Am | Dm | G7 | C |
The final sequence would look like this:
| C | F | G7 | C |
| C | F | G | E7/G# |
| Am | Dm | E7 | Am |
| Am | Dm | G7 | C |
Hopefully, this gives some insight into substituting chords to open the door to changing keys. There are many more ways to change keys and a seemingly infinite number of chord substitutions. The purpose here is to demonstrate a couple simple ways to achieve some very common modulations.
There is no such things as the right note. There is, however such a thing as “a” right note. While improvising, it can be difficult to bring a perfect performance without any tonal missteps. So, to ease the pressure of hitting “the right notes”, I offer this advice. You’re never more than a half-step from a “right” note. Without getting too technical or theoretical about it, if the note you’re playing is wrong to your ear, then a more right note should be found a half-step away. Eventually, you learn how to apply any note at seemingly any time and give the music purpose and groove while flying by the seat of your pants. Until then, you can use tips like this one to help gloss over notes you feel are best left behind. A right note is never more than a half-step away. An even “righter” note may be somewhere else entirely, but we are talking about how to get yourself out of hole you may have just dug yourself into and salvage the melody. Often, you’ll find that your mistakes can lead you down some very cool paths. Be sure to remember the audience is going along for the ride with you, so returning your stratospheric playing to the earth occasionally will help connect the ones that missed the first take-off.
Relax and jam. The notes are already there. The hard part is over. Someone already built the instrument.
Rudiments are the foundation of the most common ways to play your instrument. For drummers, this is a set of sounds that can be created with drumsticks and drums. It is not all the possibilities, but is a set that allows you to build upon in creating your own style of playing. In this blog post, I am mainly focusing on guitar, so let’s talk about some of the fundamentals you should have in place, or be working toward accomplishing. There are an endless supply of ways to play any instrument, but we are going to focus on the very basic techniques you will need, and in another post I will discuss the general theory you should know to be able to effectively communicate with other players. I will tackle a few, though this is not meant to be a comprehensive list. Remember, you are only limited by your imagination.
1. Rhythm strumming
Strumming a guitar well is a relatively simple task, however it is often overlooked what a good rhythm player’s function is, as well as what a good player is capable of bringing to the table. The fundamentals of down strumming, up strumming, and alternate picking are a key component in being a successful rhythm player. The key word is “rhythm” here. It is incredibly beneficial to use a metronome for rhythm studies, even crucial. Practice strumming whole notes, half notes, quarter notes, eighth notes and sixteenth notes along with the metronome to build an accurate timing that your band mates can rely on. Don’t overlook the whole notes. They are simple only in the strumming area. Playing a perfectly placed whole note is a critical sound that will need to be nailed in unison with the rest of the band. Being a little out of place on your longer notes is common when players get distracted. Getting distracted is also fairly common. Know how to assemble the rhythms with simple notation, so that you can be certain you won’t forget that amazing riff, and you can show your drummer what you’re trying to accomplish during the songwriting process. With faster music, the strumming patterns will become a mangled series of ups and downs. If you have practiced with the metronome on a huge variety of up and down variations, your hands should be able to sort out the necessary pattern with little effort from the brain. You need to be as solid and reliable as the drummer on your timing. You are part of that machine now. If you are a soloing god, you must put down your lightning bolts and join the team until your solo. Remember, unless you’re Yngwie, you will be playing a lot of rhythm between your leads.
2. Power Chords
Power chords are defined as the interval of a Perfect Fifth, or 7 half-steps (frets). They don’t technically qualify as chords (two pitches are an interval, two or more intervals are a chord), but in all forms of rock and metal they are truly essential. Power chords are simple and effective, and coincidentally are what I refer to as non-committal. They are neither major, nor minor. This means that in a pinch, you can use power chords until you figure out which chords are supposed to be major, minor, and so on. Power Chords are notated by using the root note name and the number 5, indicating a fifth above the root. For example, A5 means A and E, or A and the 5th note of the A scale. If you have heard Metallica, Green Day or Nirvana, you have heard power chords. Distortion takes very well on these sparse chords, which is why you find them in any distorted genre.
3. Dynamic Control
Dynamics are essentially the discussion of how loud or soft to play. Dynamics are an essential part of any music. Learn how to play the quietest you can and still develop a beautiful tone. Learn how loud you can play to discover your ceiling. The range between those two volumes is your window to work with. Volume pedals can be extraordinary, but they take a little practice to use them effectively. I don’t personally use one, as I learned to play within my window and just place my window where I want it. Over-exaggerate your dynamics in practice and learn what the limits are. You want to convey the feeling while maintaining the quality of your tone. Experiment with various picking techniques and hybrid picking to find the greatest range of dynamic control.
4. Know Thy Neck
A fundamental grasp of where the notes are on the neck is incredibly important. At the very least, you need to know the two thickest strings (E and A), so you are able to locate the root notes of chords you are going to play. Without knowing at least where the notes are located, you will be extremely limited in your flexibility. Music flows through you, but you must know where the sounds are on your instrument for your true voice to come through. Know your neck, it’s number one.
6th String E-F-F#-G-G#-A-A#-B-C-C#-D-D#-E
5. Barre Chords
The next step in chords will be barre chords. They are truly an essential component for giving you more chords for less memorization. They are more difficult in terms of hand strength, but are worth it in the long run. Each chord shape you memorize will give you all 12 of that chord type, which makes pulling chords up quickly much easier than using the thousands of open chord shapes. The open chords are great, and are the basis for many barre chords, the fingerings just don’t offer up as easy and diverse of a set of chords. If they are difficult for you, keep practicing. It’s most likely the strength or index finger placement that is the usually the issue. You can try lighter strings, or hand strengthening devices like the Gripmaster. Embrace them, and you will find guitar much easier.
Thanks for tuning in. There are always more elements to explore, and I look forward to taking that journey with you.